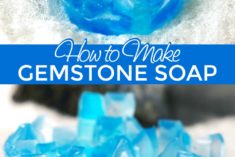
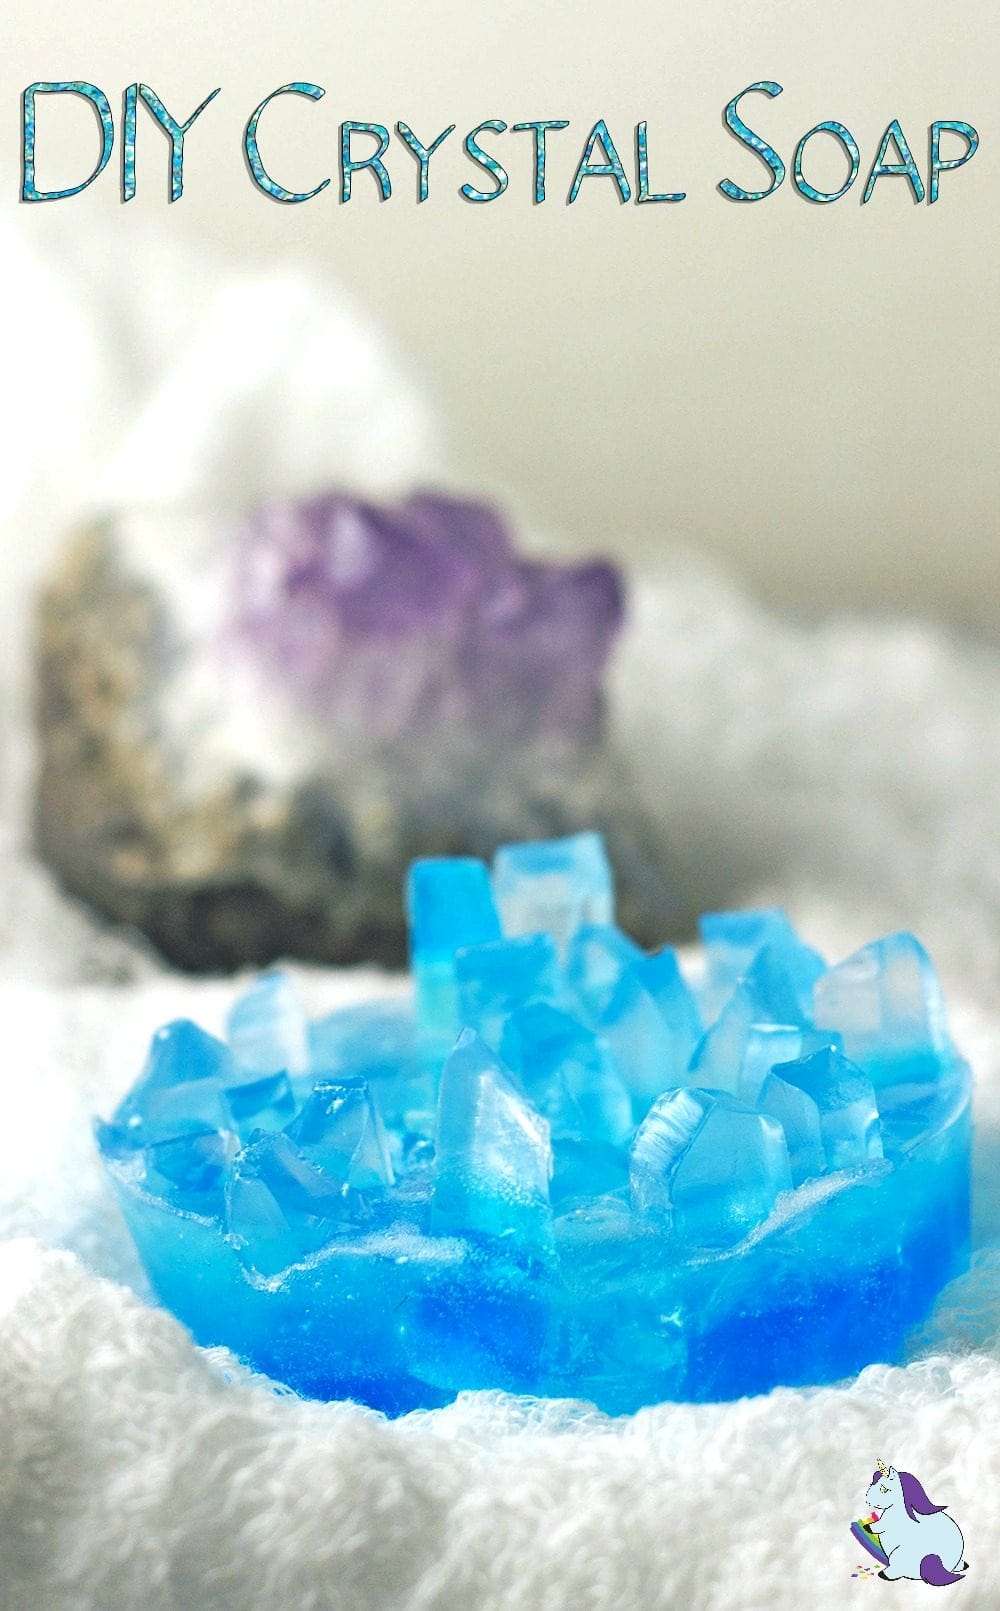
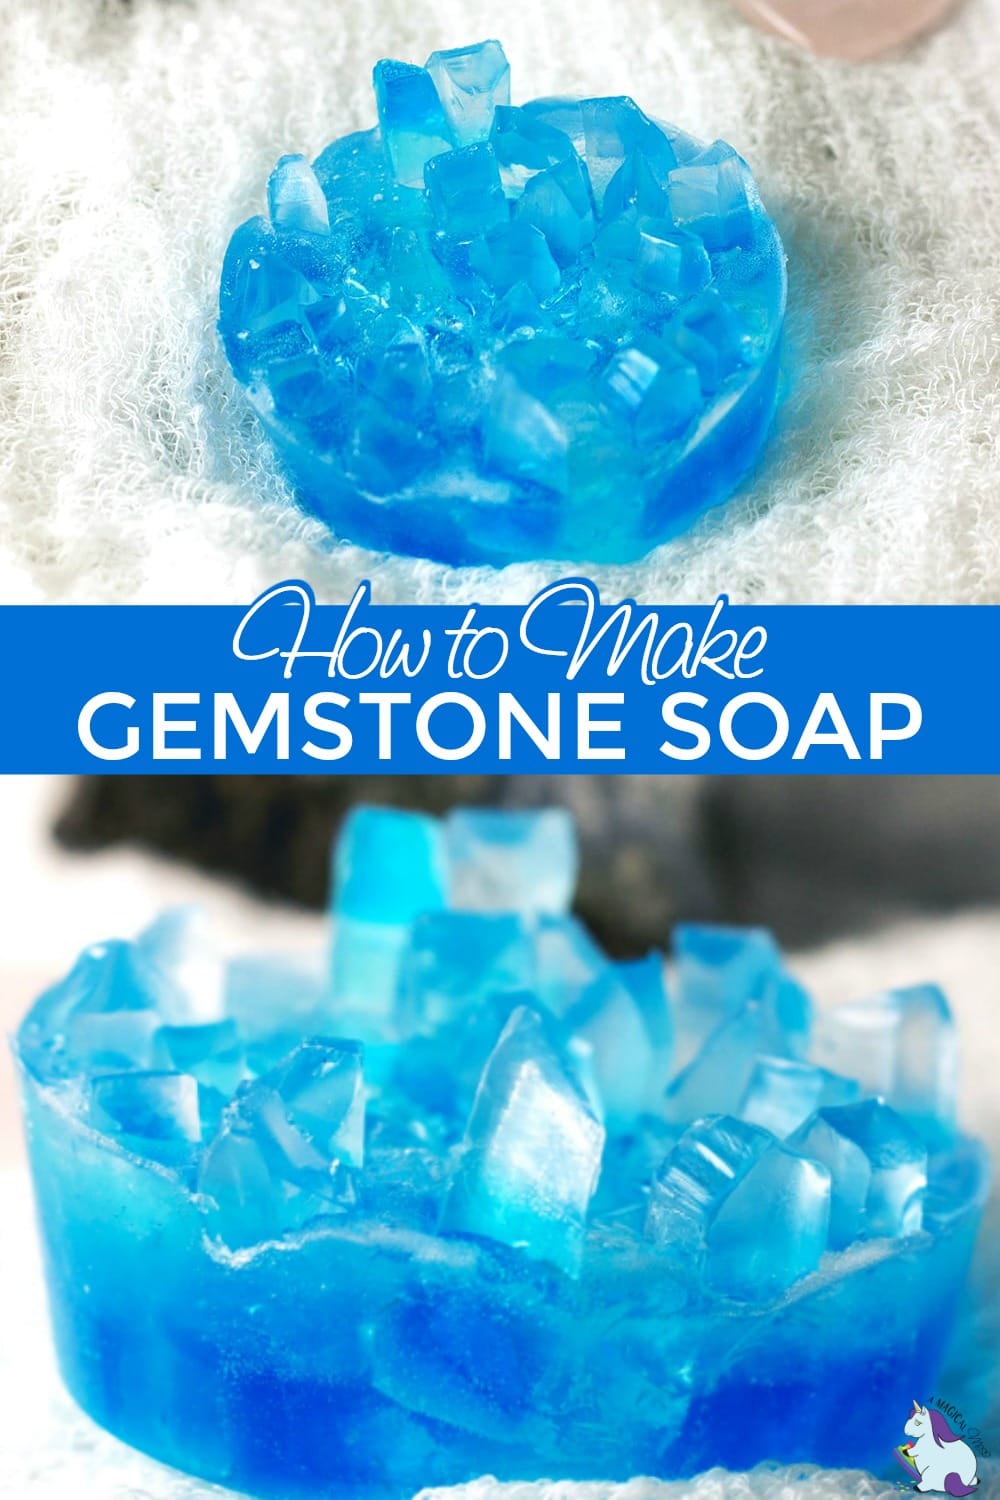
DIY Crystal Soap that Looks Like Gemstones
DIY crystal soap that looks like gemstones is the first of, hopefully, many magical projects to come. I don’t do a ton of DIY projects, so I am easily intimidated. However, I was encouraged by my friend, Dawn at Cutefetti to do some magic-like creations.
I headed on over to Google and found this DIY gemstone soap tutorial. (The video I originally linked to is gone.) It seemed a little advanced-level for me, but her video made it look easy enough. Well, here was my experience.
First off, I need to dig deep to find the patience for crafts. I try to tap into the therapeutic benefits of working to create something beautiful, but my mind likes to quickly shut that down.
Second, I did this away from home, so of course, I forgot a bunch of things I needed. For example, I didn’t have a good tripod to create the video. But, I promised I was going to post all of this no matter how it turned out – magic or mess.
After I had finished the crystal soap, I have to say it wasn’t difficult. It was a bit time-consuming, but that was partly my inexperience.
I would love to do it again with other colors. I used soap coloring, but next time I will use food coloring for more vibrant colors.
Homemade crystal soap makes an excellent and unique gift idea for anyone, especially if they are into crystals and gemstones. Play around with colors and even add some luster for shine.
How to Make Crystal Soap that Looks Like Gemstones
What you need to make crystal soap
- Transparent glycerin soap
- Round soap mold
- Soap or food coloring
- Essential oils
- Spray bottle of rubbing alcohol
- Sharp knife
- Cutting board
How to make the crystals for the crystal soap
Step One: Make the Crystal Pieces
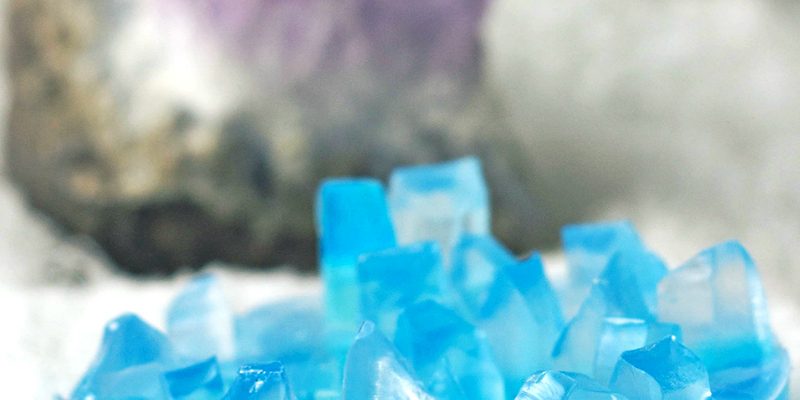
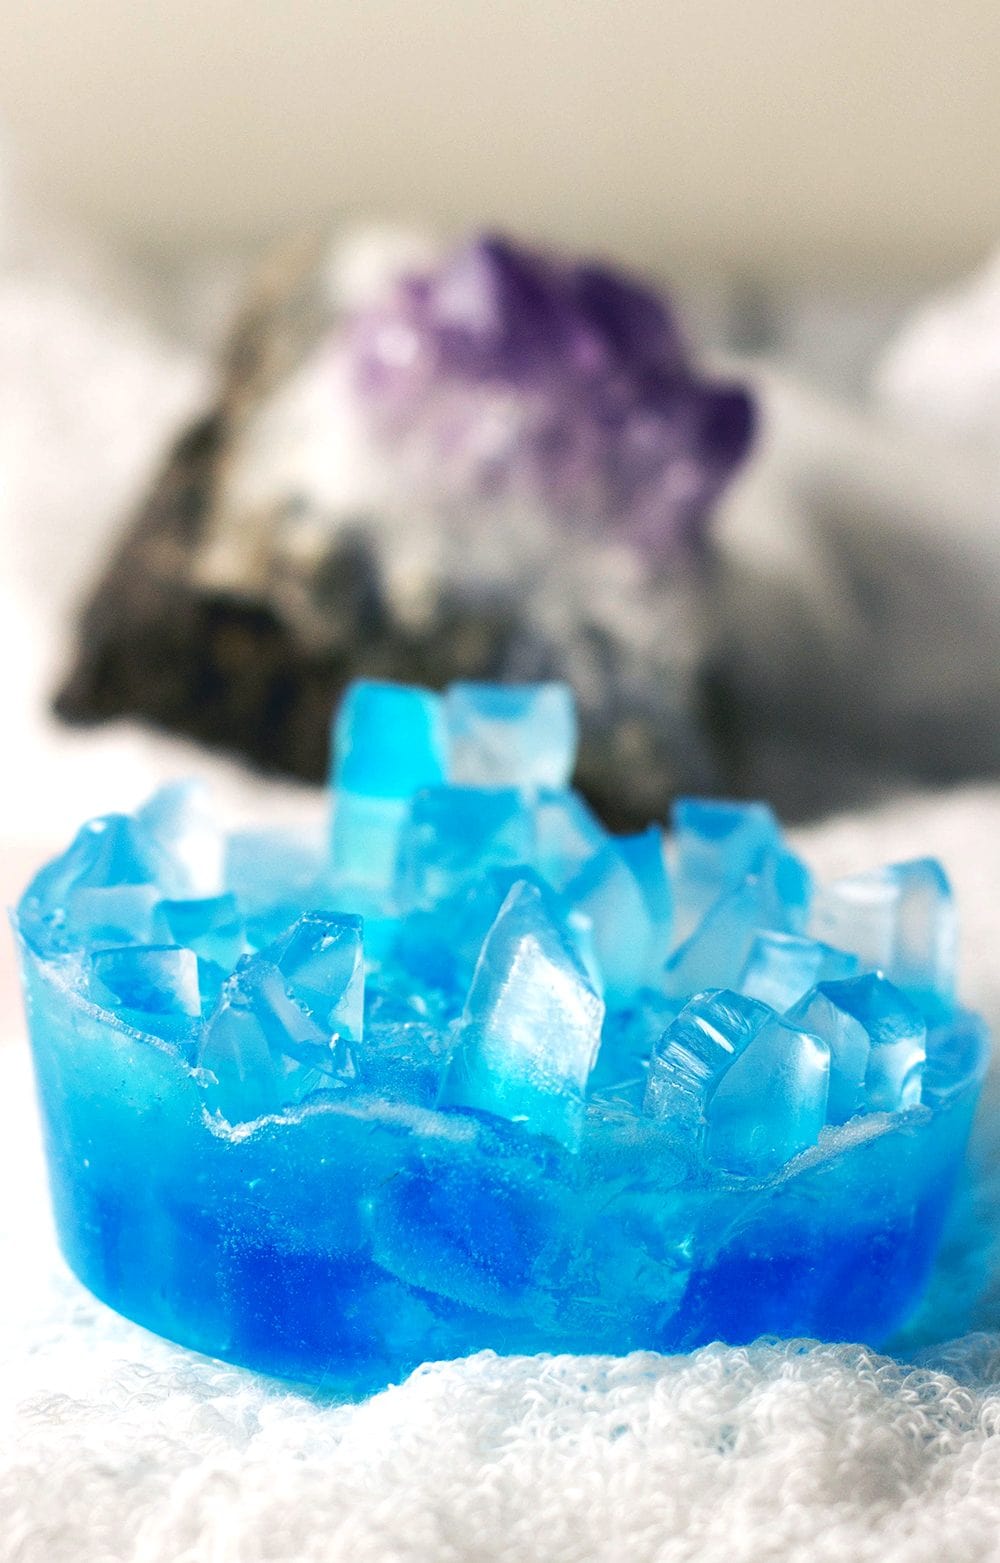
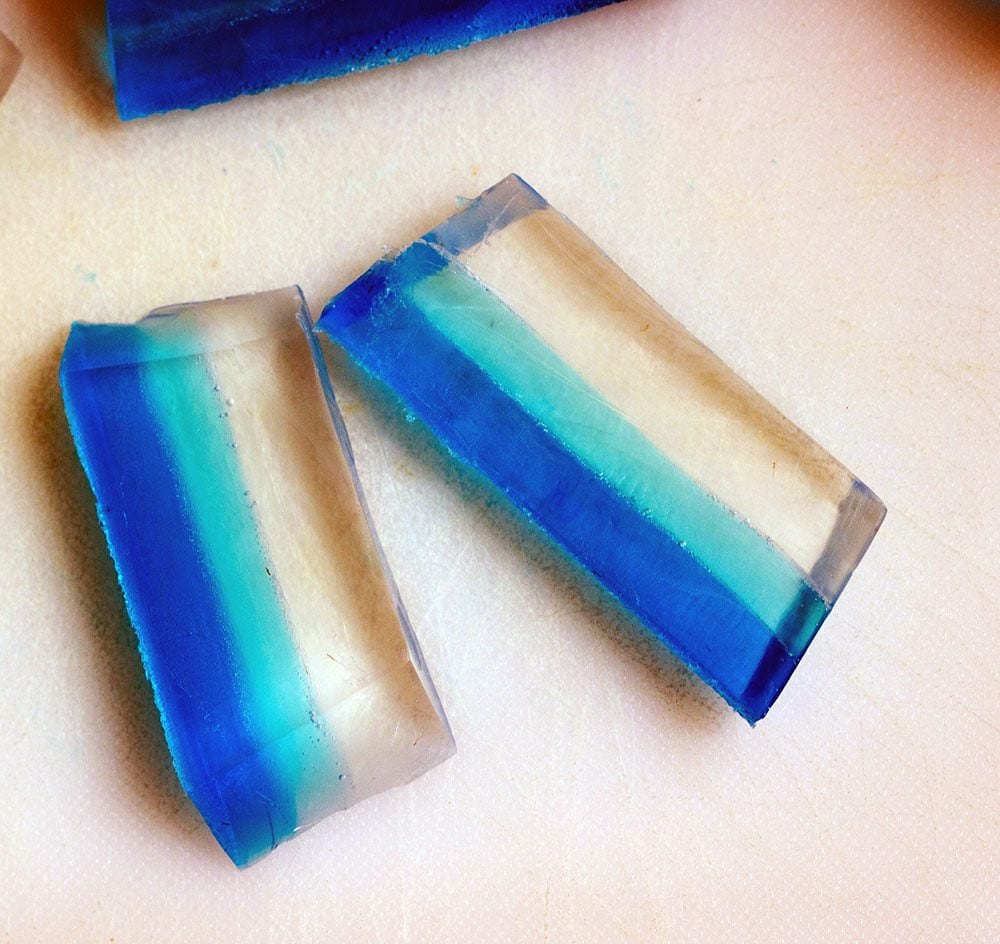
The first step is to make the pieces of the gemstone that will jut out of the base. We are making layers in different colors to give a gradient effect.
The first layer is clear, then a lighter blue, and then a darker blue.
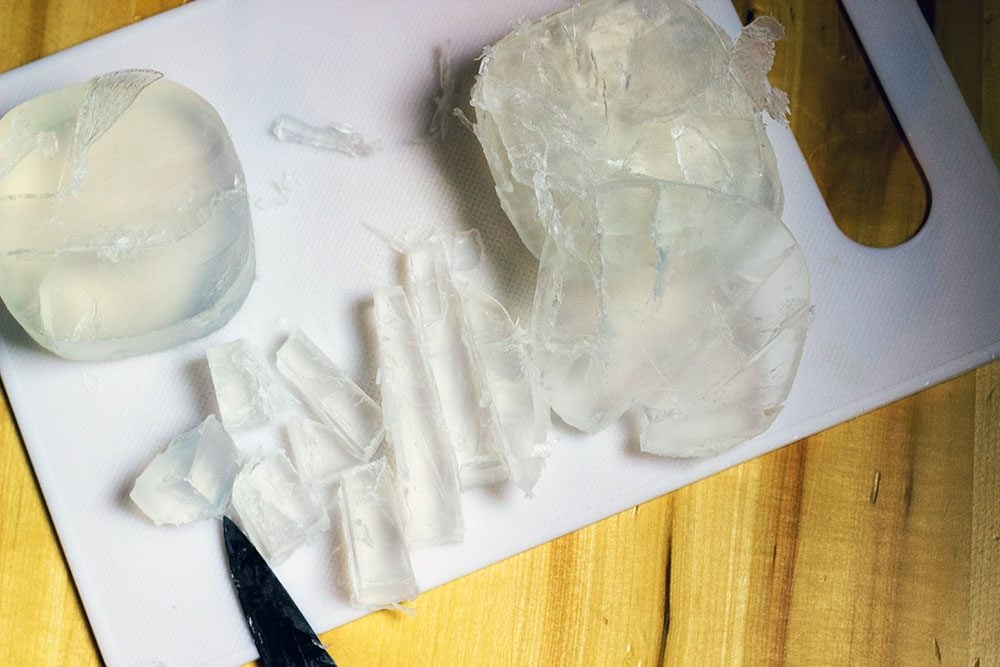
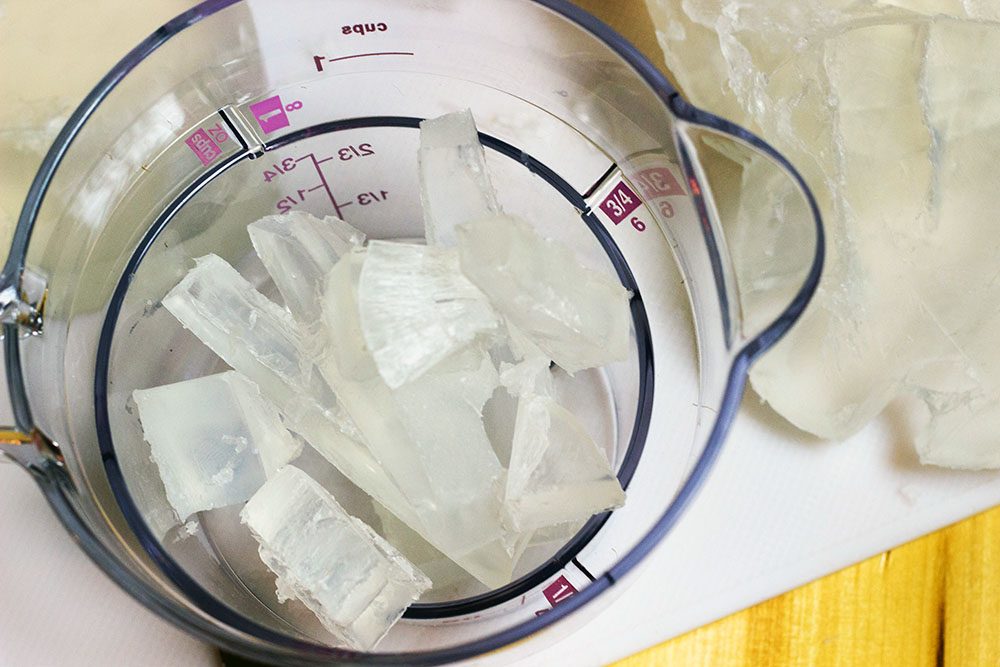
Carefully cut the block of transparent glycerin into chunks. You want a sharp knife for this to save your sanity. I definitely need a new knife.
Put pieces into a microwave-safe bowl and heat to melt. This only takes seconds, so watch it closely.
Pour a thin layer of the melted clear soap into your mold. Leave the rest of the liquid in the bowl.
Let the soap harden and cool in the mold. Once it’s hardened, lightly scratch it with a fork. This texturizes the surface to help the layers stick together.
Reheat the bowl with the glycerine since it’s most likely starting to thicken at this point.
Stir in your choice of essential oils and coloring. This is the second layer, so don’t make it too dark.
Spray rubbing alcohol on the first layer in the mold before pouring the second layer.
Pour the second layer on and let it harden and cool.
Reheat the leftover soap again if needed. Add more coloring to deepen the color. This is the third and final layer, which you want to be the darkest.
Scratch the surface of the second layer of soap in the mold and spray with alcohol. Pour on the third layer of soap and let it harden.
Once the three layers of soap are completely cool, carefully pop them out of the mold.
Take your layered soap creation and cut it into slices.
Cut the clear ends at an angle to create triangle shapes.
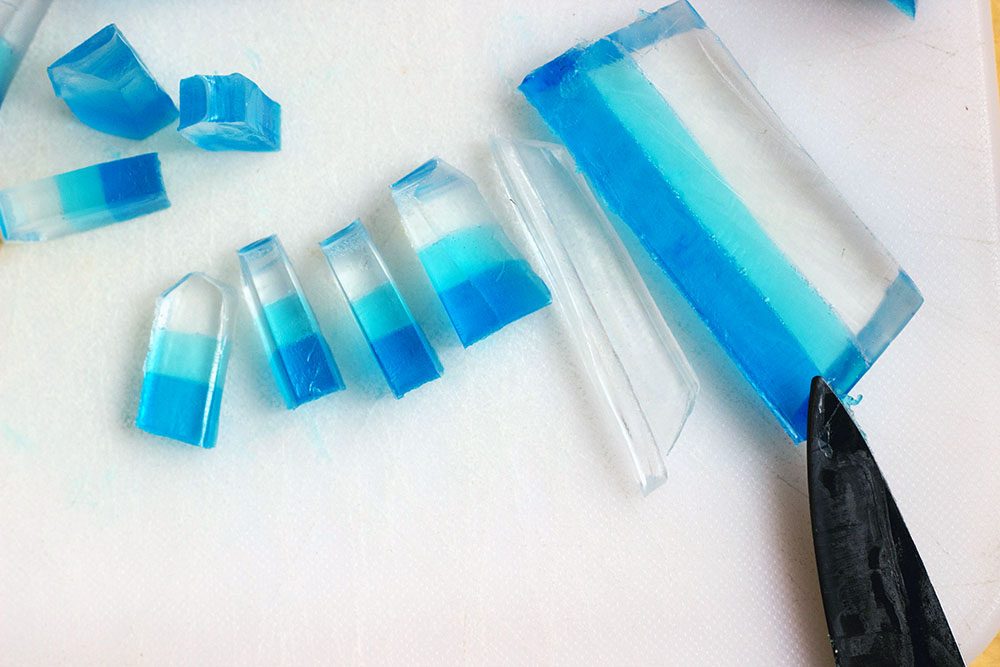
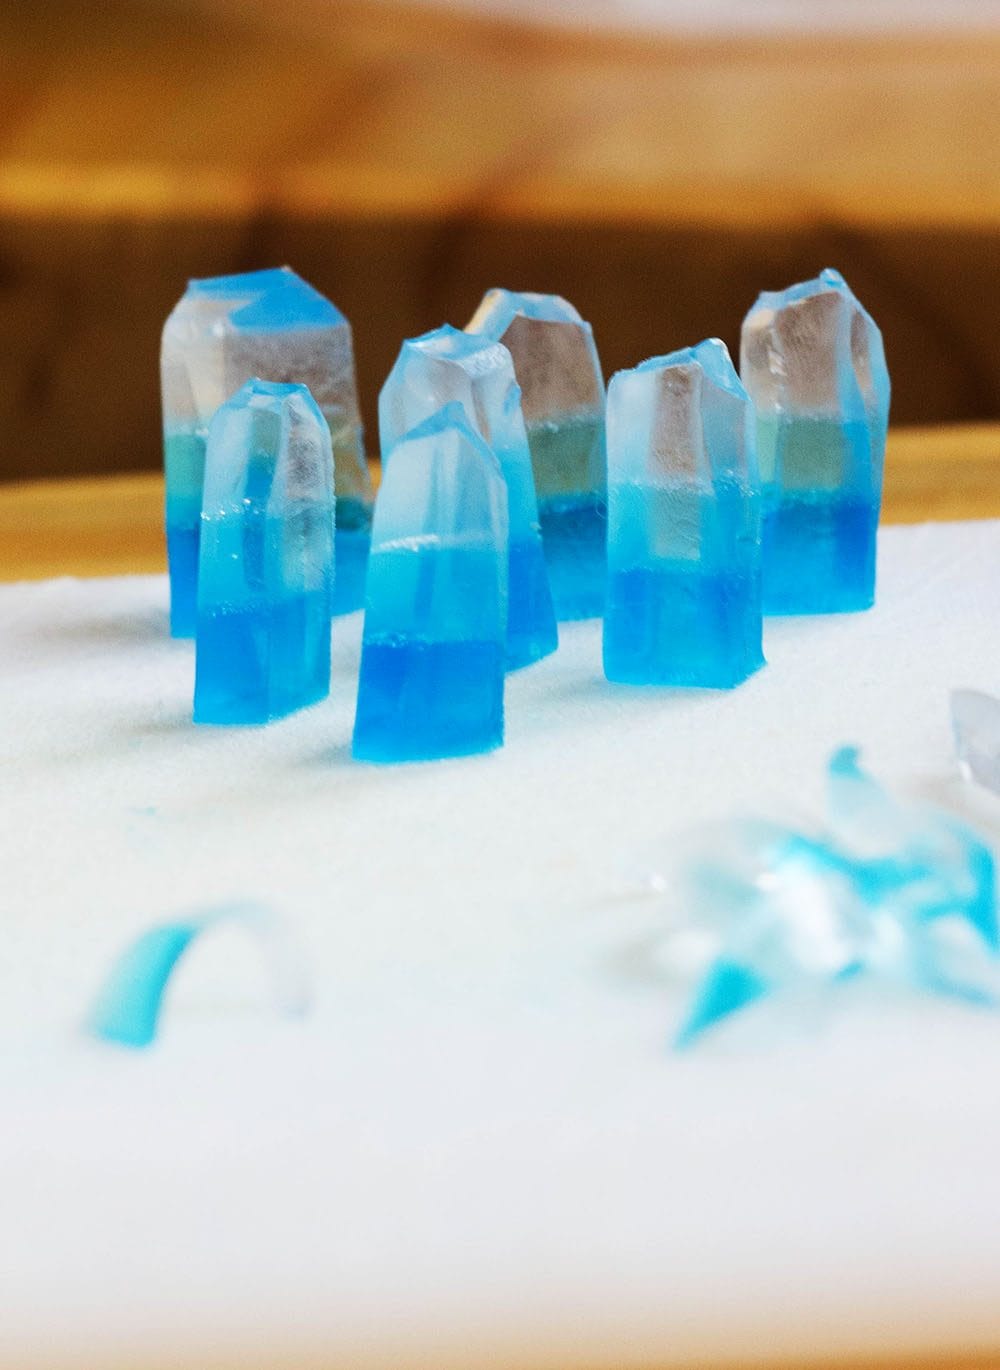
Keep slicing them into smaller pieces that start to resemble crystals.
Continue cutting to shape your crystals into unique pieces. Save all the little scrap pieces!
Cut the little scrap pieces into even smaller chunks. Set them aside.
How to create crystal cluster soap that looks like gemstones
Now it’s time to put it all together to make our soap look like a gemstone.
Take more chunks of the clear melt and pour soap and heat it.
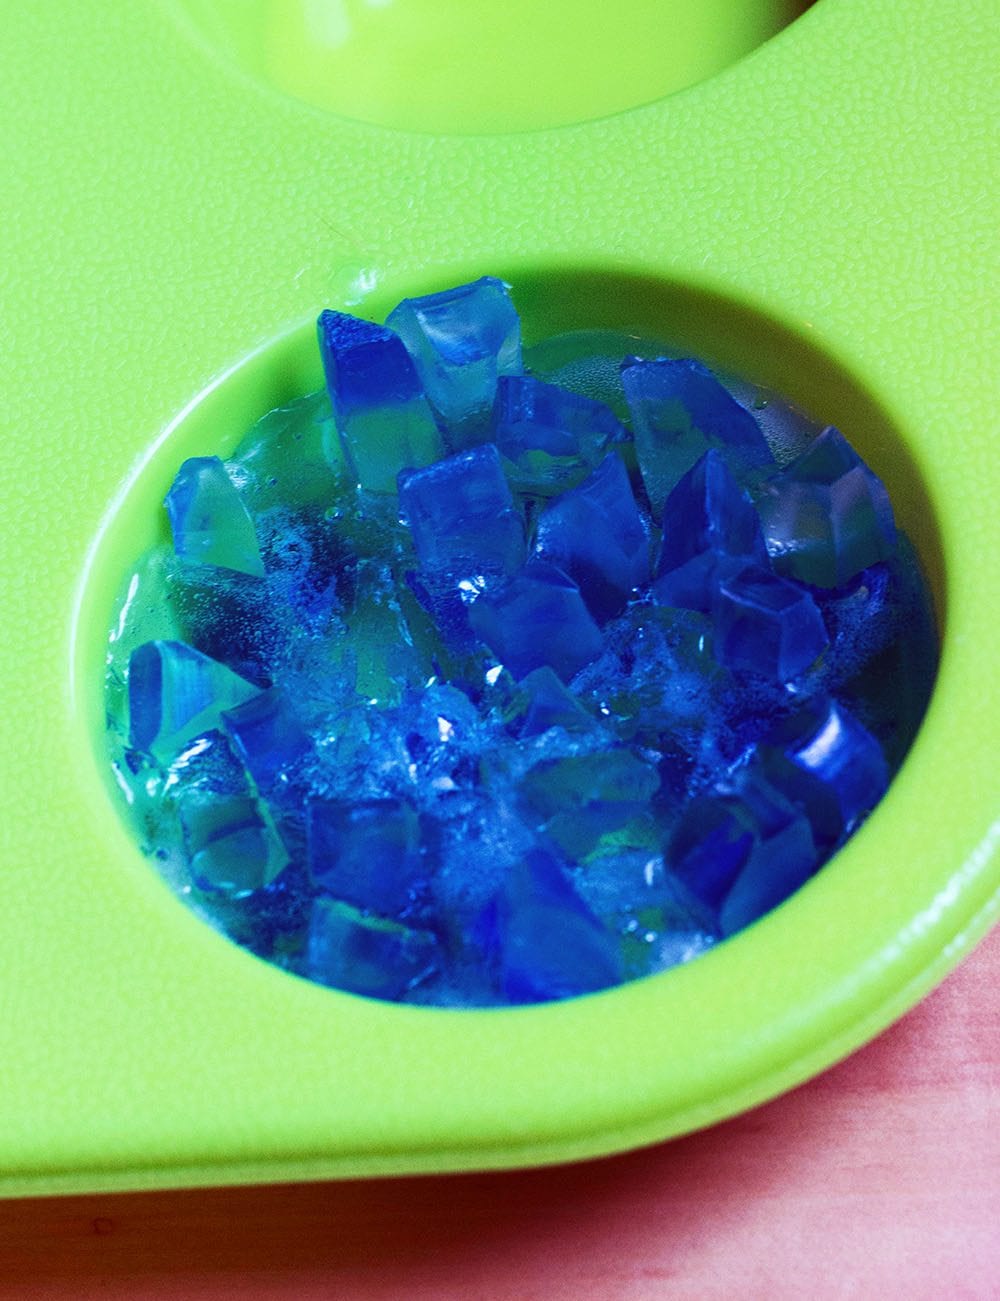
Pour a thin layer into the mold. Quickly add the tiny scrap pieces of soap. Just sprinkle them on top of the layer.
Add in the crystal pieces before the soap hardens.
Don’t overthink it, just place the pieces in so they jut out like a gem in nature would.
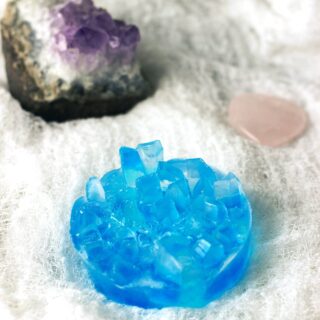
Let everything cool and harden completely before removing from the mold.
This is where I lack artistic ability. I freaked out when the pieces fell down in the mold when, really, this is not something you want to look perfect.
If you see a real gemstone, the stones are jutting out every which way. So, add the pieces in however you like. If some fall, it’s meant to be.
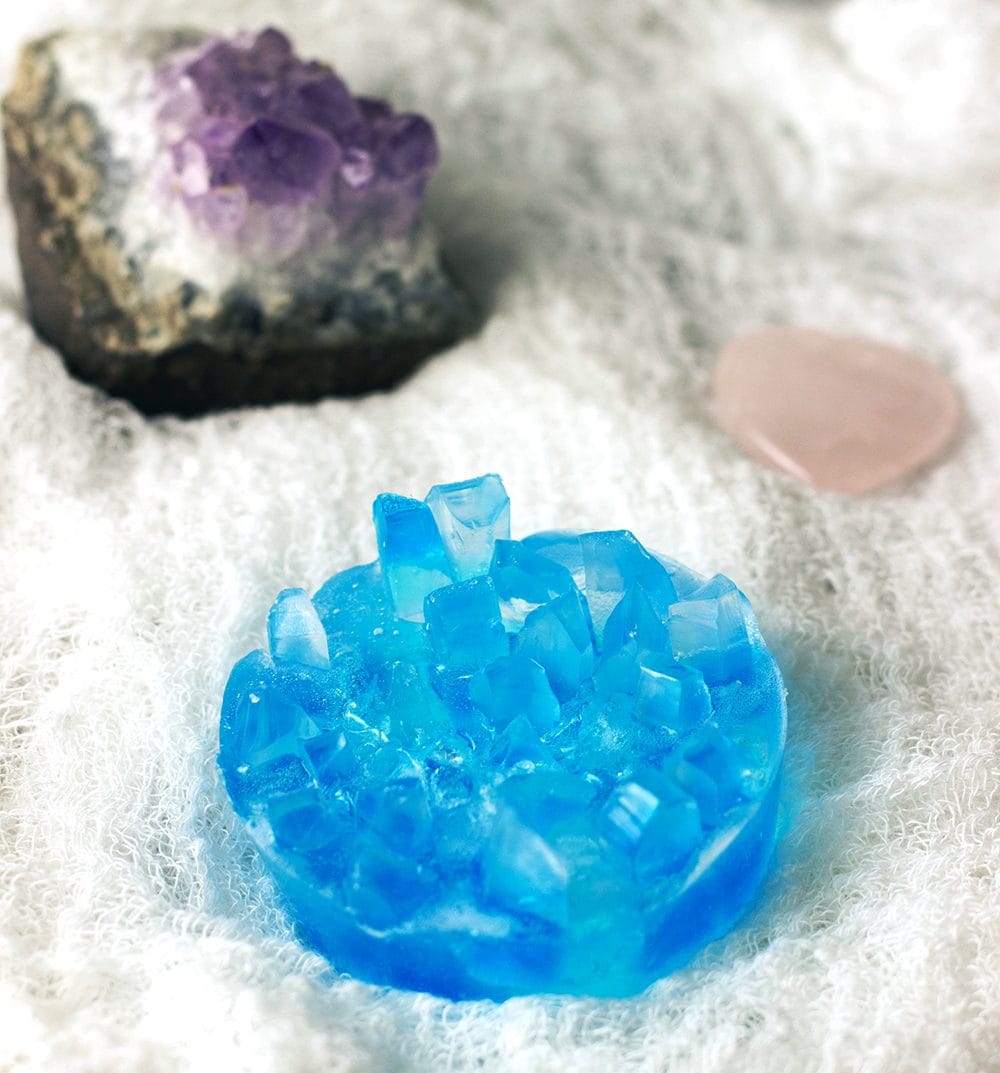
If you are gifting the soap, consider brushing it with a little luster dust. It will wash away quickly but looks nice for gifting.
Homemade Gemstone Soap Craft
Equipment
- Sharp knife
- Cutting board
- Spray bottle of rubbing alcohol
This post contains affiliate links. As an Amazon Associate, I earn from qualifying purchases at no extra cost to you.
Instructions
- Carefully cut the block of transparent glycerin into chunks with a sharp knife. Put pieces into a microwave-safe bowl and heat. Keep an eye on it since it only takes seconds.Transparent glycerin soap
- Pour a thin layer of melted clear soap into your mold, and leave the rest of the liquid in the bowl. Let the soap harden and cool in the mold.
- Texturize the surface of the hardened layer by lightly scratching with a fork. This helps the layers stick together.
- Reheat the bowl with the glycerin since it's probably started to thicken at this point. Stir in your choice of essential oils and food coloring. This will be your second layer, so don't make it too dark.Soap or food coloring, Essential oils
- Spray rubbing alcohol on the first layer before pouring the second layer. Pour the second layer and let harden.
- Reheat the leftover soap again if needed. Add more coloring to deepen the color. This is your third and darkest layer.
- Scratch the surface of the second layer and spray with alcohol before pouring the third layer.
- Allow to cool completely before popping out of the mold. Take your three-layer soap creation and cut it into slices. Cut the clear ends at an angle to create triangle shapes. Slice into smaller pieces that start to resemble crystals.
- Continue cutting to shape your crystals into unique pieces. Save all of the tiny soap scraps. Cut them into even smaller pieces. Take more chunks off the clear glycerin and heat it.
- Pour a thin layer into the mold. Quickly add in the tiny scrap pieces of soap first. Add the crystal pieces before the soap hardens.
- Let everything cool and harden completely before removing from the mold.
Video
Notes
DIY Bath & Body Projects to Make:
- Rose petal bath soak in tub teas
- Cotton candy unicorn soap
- Exfoliating coffee soap
Pin this image to your craft board to save and share!
So, I guess my color looks like aquamarine. What kind of DIY crystal soap would you like to make?
I am obsessed! These are so cute and would make an awesome gift.
What a neat idea. This would make a great gift too!
I love the final product. My science loving kiddos will have a blast helping me make these for some summer fun.
The DIY Crystal soap is amazing and the color is so vibrant! What a great idea and a fun soap to make with the kids!
I love this diy. This would be a great gift idea.
I love it! I will be making these for Christmas gifts! Thank you so much for showing me how 🙂
Awesome! Let me know how they turn out. 🙂
i love to ake this soap at home . i love hoq innovated it is and its kid frieendly.
Oh wow, these are so cool looking! They almost look too pretty to use,
~Hi Jennifer!
What a fabulous job! I’ve been professionally soaping for 5 years, and I can’t believe you’ve never done this before. You’re right. Handmade soap is not supposed to look perfect, that’s the beauty of it’s design. Well done!
Oh my goodness, thank you!!! Please let me know if you do it. I’d love to see how yours comes out! So fun. 🙂
This is so cool! I’ve always wanted to try making my own soap but haven’t tried yet. This is very inspiring.
Yay!!! Show us a picture once you do! 🙂
oh wow that looks so pretty for a bathroom,,i like that there are different colors to make,,i wish i had time to try this but im not very DIY
i am going to try to get enough supplies for a classroom to make and find a teacher at my grandkids school to donate them to.
That’s an awesome idea! Let us know how they turn out!!
OMG this was a tedious, very time consuming but I realized I made a bit too MUCH soap lol, thanks for a lovely soap project! Follow to my website to see my results & to purchase these “rock” soaps @ Etsy shop LakeSideSoapslnc!
Haha! Yes, agreed. After a little bit I found it therapeutic. I will check yours out!